

Cloudreve是一款非常优秀的国产网盘系统,可对接 Aria2 实现离线下载,支持使用本机硬盘、阿里云OOS、腾讯云COS、OneDrive等第三方存储,同时可以在线预览图片或视频文件,部署在自己的服务器上不会受到太多制约,无论是个人自用或多人使用,在功能上都可以满足。

安装准备工作
1、Cloudreve的安装方式有几种,本文采用通过宝塔可视化面板搭建配置,并设置反代通过域名访问我们的网盘,关于宝塔面板安装和使用参考:【Liunx建站面板】宝塔面板的安装和使用图文教程文章源自技术白-https://jishubai.com/368.html
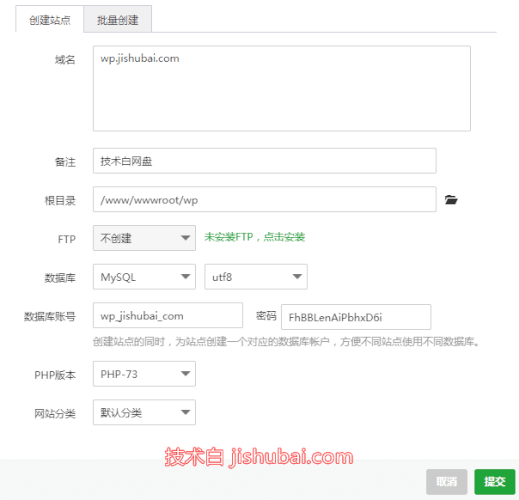
2、进入到宝塔面板网站选项创建一个网站目录作为Cloudreve程序的运行目录;文章源自技术白-https://jishubai.com/368.html
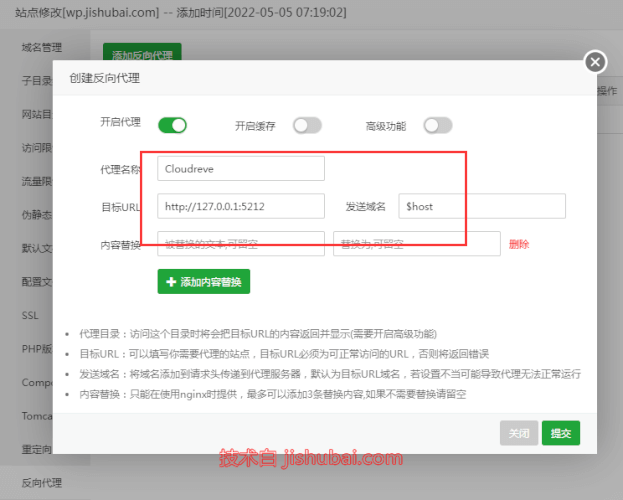
3、找到刚才创建的网站-设置-反向代理,设置反代用于域名访问,如果不需要域名访问直接用IP访问,则无需该操作;文章源自技术白-https://jishubai.com/368.html
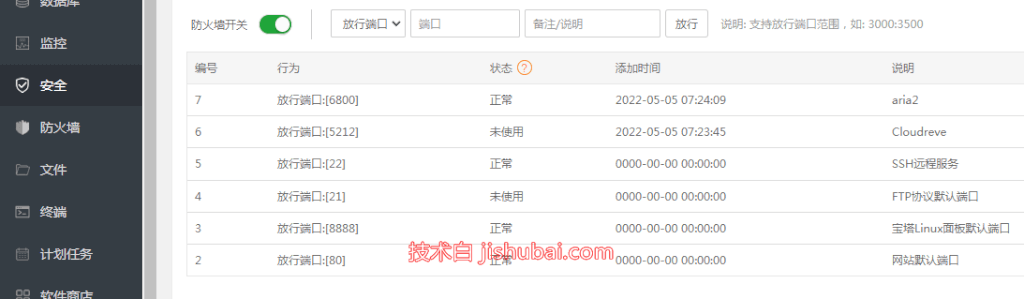
4、在宝塔安全界面,放行5212端口,如果服务器有其它防火墙设置,也请相应放行该端口;文章源自技术白-https://jishubai.com/368.html
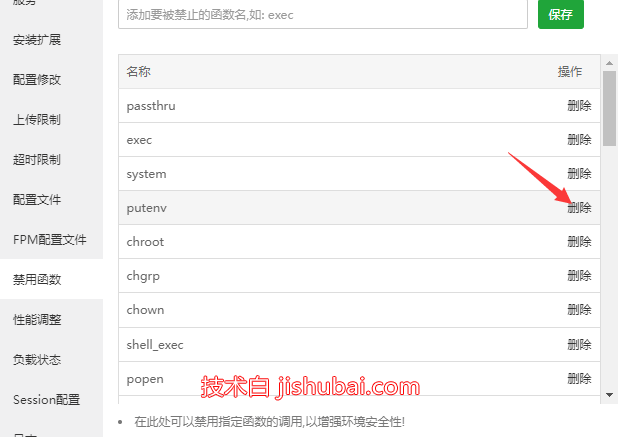
5、找到PHP设置,解除禁用函数:putenv,proc_open文章源自技术白-https://jishubai.com/368.html
下载安装Cloudreve
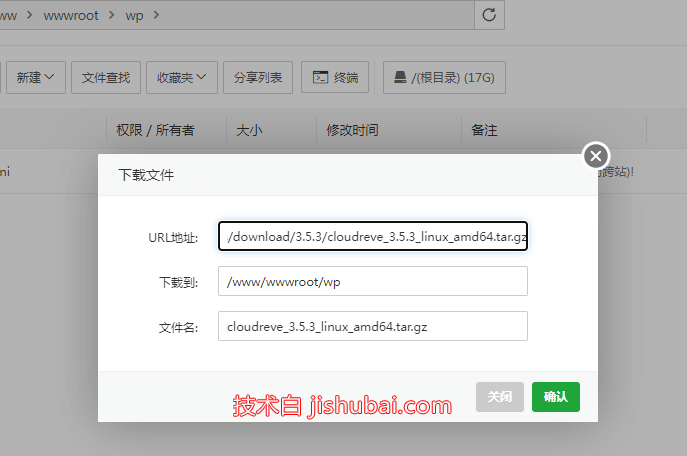
1、进入到前面创建好的网站目录,删除多余的文件,然后通过宝塔的远程下载拉取cloudreve安装包,并把安装包解压到网站根目录;文章源自技术白-https://jishubai.com/368.html
- Cloudreve软件发布地址:https://github.com/cloudreve/Cloudreve/releases
2、通过SSH工具连接上服务器,进入到网站根目录安装依赖,注意替换网站文件名;文章源自技术白-https://jishubai.com/368.html
cd /www/wwwroot/网站文件名
composer require topthink/framework
composer require phpgangsta/googleauthenticator:dev-master
composer require endroid/qrcode
3、继续在根目录输入: ./cloudreve 命令进行安装运行,记住管理员账号密码,当退出这个窗口cloudreve会停止运行,建议通过进程守护的方式运行;文章源自技术白-https://jishubai.com/368.html
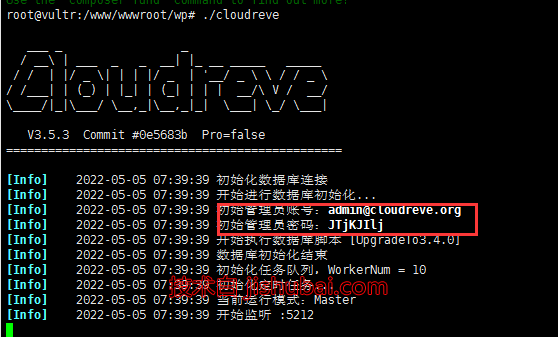
4、接着在浏览器输入设置的 域名 或 http://IP地址:5212 ,然后输入上面的账号密码就能进入到网盘了;文章源自技术白-https://jishubai.com/368.html

配置进程守护
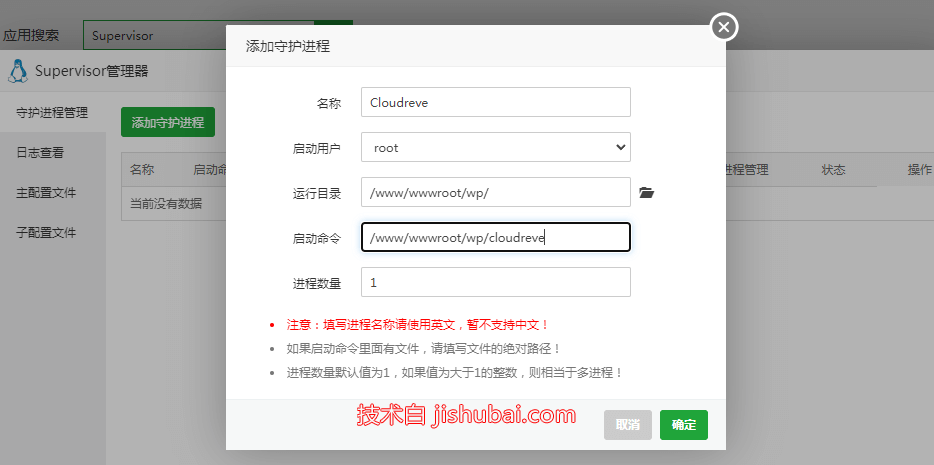
1、在宝塔面板的软件商店里,找到Supervisor安装,并配置cloudreve的守护进程,注意关闭前面的SSH窗口,由于前面通过命令行已经启动了Cloudreve,这里守护进程再启动会冲突异常;文章源自技术白-https://jishubai.com/368.html
对接Aria2实现离线下载
1、Cloudreve的离线下载功能由Aria2驱动,请在同服务器上安装Aria2,安装方法参考:【服务器工具】离线下载工具-Aria2一键安装管理脚本
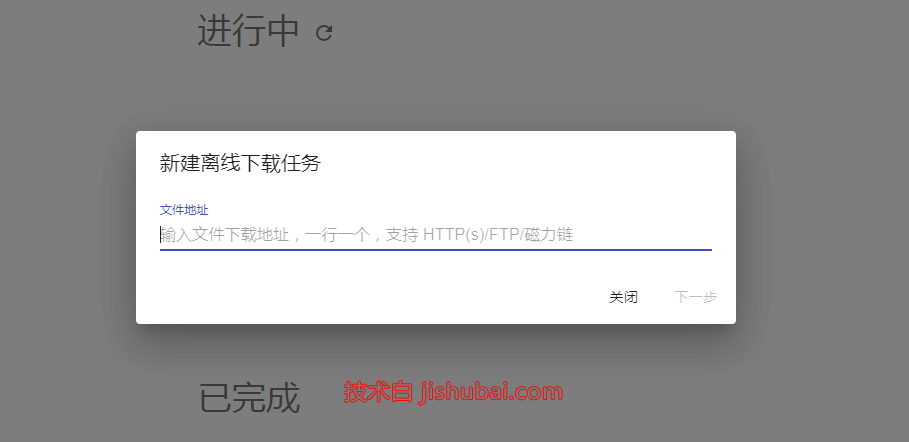
2、进入到Cloudreve页面,点击左上角的账户-管理面板-离线下载节点,启用主机接管离线下载任务,并输入Aria2的配置信息;

3、保存后就可以在用户界面创建离线下载任务了;
- 本站TG群组:skill_blog 梯子:Ack网络